Welcome to gadgetmanBrian!

With the start of the new year, I am excited to announce the official launch of gadgetmanBrian!

gadgetmanBrian offers services to help individuals, small businesses, content creators and influencers make the most of their personal technology.

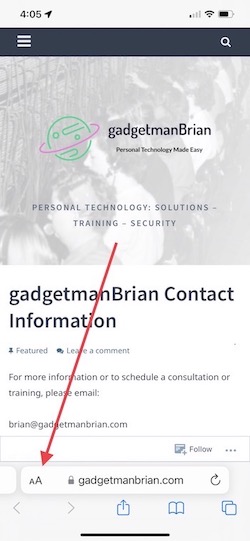
gadgetmanBrian is a ‘Personal Technology Consultancy’, and I am Brian Herskovitz, your Personal Technology Consultant.

What is a Personal Technology Consultant?

A Personal Technology Consultant is someone who can help you with your technology needs.

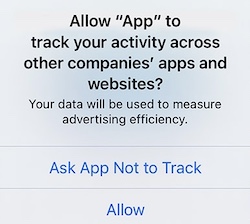
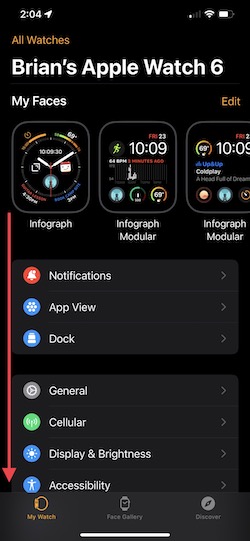
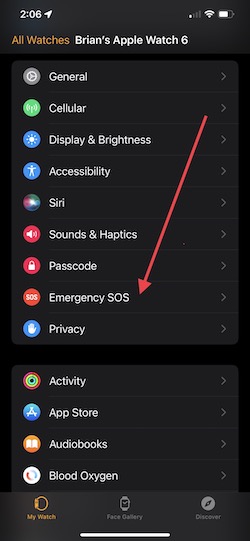
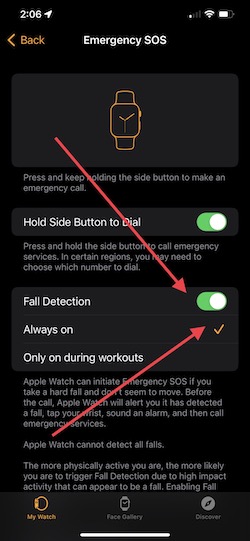
From making the most of your device, to training on using any app or device, to making sure your online privacy is safe and secure, gadgetmanBrian can help you make the most of your personal technology.

gadgetmanBrian works like this; everyone’s needs are different, so I take a completely personalized approach for each client. The initial consultation has no charge; we’ll have a brief discussion of your needs. Then I’ll prepare an evaluation that I’ll share with you. If it meets your needs we’ll move forward on a fixed price, hourly or retainer basis.

For my friends and family, I have been the go-to person for tech support for years, and I’m happy to now offer support, solutions and training to the public! Call, text or email for an appointment; I’m excited to learn how I can help you!

Explore some free tips below, and check back regularly for updates!

How To Use iMessage Effects

The Messages app has some very cool, but not very obvious features. One of the most popular is ‘iMessage Effects’; this is when you open a message and see confetti fall from the top of the screen, balloons rising, fireworks, a spotlight effect, etc. Here is how to add these effects to the messages you send…

After you type a message, long press (press and hold) the send button (small blue round button with arrow)…

Image.jpeg

This pops up a ‘Send with effect’ screen, with Bubble and Screen as options…

Image.jpeg

The Bubble screen has 4 effects listed; Slam, Loud, Gentle and Invisible Ink, you can touch the dot next to each one to add the corresponding effect.

The Screen screen ¯\_(ツ)_/°¯ is where the colorful screen effects are listed, and you can choose among them by swiping left or right, and the dots at the bottom indicate which screen you are on and how many there are total.

Just choose the effect you want, and press (regular quick press) the send button to send.

Image.jpeg

Enjoy!

HELP! My iPhone isn’t Ringing and Calls Are Going Right to Voice Mail…

Hello! This is a question gadgetmanBrian reader LS recently asked. He has a friend whose iPhone simply wont ring, and all calls go directly to voice mail. She has checked the ringer settings, the mute switch, and everything looks like it should ring, but multiple callers have reported that they do call, but the calls always go to voice mail.

There is actually one simple thing that is the most common cause of this happening; the phone is set to ‘Do Not Disturb’, and that was the cause in this situation. ‘Do Not Disturb’ is part of ‘Focus’; a set of ways to silence calls and notifications depending on your situation. As an example, Movie, Sleep and Work are some of the built-in Focus modes; these can be customized and are a powerful way to control how you interact with your device, and can be found under Settings -> Focus.

You can check if your device accidentally went into Focus by looking in Control Center, which you access by pulling down from the top right corner of the screen (pull up from the bottom of the screen to dismiss). The Focus section will expand when you tap on it, and any active Focus will be highlighted. To turn it off just tap it, the highlight should disappear and you will get calls and notifications like normal (see below).

Enjoy!

Privacy Note – How To Turn Off App Tracking Transparency…

Hi gadgetmanBrian readers! Today’s tip is about an iOS/iPadOS feature called App Tracking Transparency (known as ATT). This is an iPhone (and iPad) system that allow apps to track you across other apps and web sites that are not part of the original app you are using.

An example of this is Facebook. The Facebook app you have installed on your iPhone doesn’t just track what you are doing in the Facebook app itself; it tracks your use of ‘other’ apps, like Snap, Twitter, TikTok, YouTube, etc.

Not only that, but it can track the websites you visit in Safari, your location, and any other information the app’s developers want to track. It uses this information to sell advertising, sell personal data, identify other apps to buy, and as part of your overall social profile.

This kind of app tracking is done without explicit permission from the user, when you agree to the Terms & Service (T&S) of any app or service, you are granting permission to collect all kinds of personal data, and of course most people never read the T&S.

A few years ago Apple identified this as a potential risk to privacy, and an opportunity to give users more control. iOS now has built in tools to allow you to proactively control how this tracking works on your phone.

In Settings -> Privacy there is a section called Tracking (see below), and it’s placement near the top of this page shows its importance to Apple. Click Tracking, and you see a button that will allow apps to ask permission to track you. I have mine set to Off (not green); I do not want to be tracked, and I do not want apps to have the ability to even ask to track me, these requests are automatically denied.

If you turn this On (green), you will see notifications from apps asking your permission to track you, and as you can see Apple has a link to more information; https://support.apple.com/en-us/HT212025. If you do want apps to ask you about tracking, leave this on. You’ll see which apps want to track you and gives you control over which ones stay on.

Online and electronic device privacy is very important, and this is just one tool to help give you control.

Enjoy!

How to turn on Apple Watch Fall Detection…

Hi gadgetmanBrian readers! Today’s tech tip is about an amazing health & safety feature of the Apple Watch; Fall Detection.

By combining sensor data when your Apple Watch is on your wrist, the watch can detect if you have fallen. It displays a notice about this and gives you a quick way to call emergency services (911 in USA).

However, if the watch detects you have not moved for one minute, it will automatically call emergency services. During this minute the watch will actually try and wake you, by tapping your wrist and sounding an alert with increasing intensity. After calling 911, your watch will send a message to your emergency contacts (Medical ID in the Health app) with your location letting them know you’ve had a hard fall and emergency services have been called.

Keep in mind fall detection is not absolutely foolproof. It not guaranteed to detect falls, but it can be a useful addition to your overall health protection.

Fall detection is not always turned on by default, so below are easy steps to make sure fall detection is active and providing you protection…

Open the Watch app on your iPhone, scroll down to and click on Emergency SOS. Make sure Fall Detection is on and set to Always on, see below. You can also access your emergency contacts at the bottom of this screen.

That’s it! Hopefully you’ll never need this feature, but it can give you peace of mind to know your Apple Watch is helping protect your health.

Enjoy!

How to reset AirPods…

Hi gadgetmanBrian readers! Today’s tip is about AirPods; one of Apple’s most-loved products of the last 5 years.

There are many features and functions, and I’ll cover some of these in upcoming posts, but today we’re going to discuss how to reset AirPods.

Why reset AirPods? Well as amazing as they are, sometimes AirPods just don’t work (or won’t charge). You put them in your ears and they either don’t connect, the audio is garbled, etc. When there are issues, you can first try and put the AirPods back in the case and try them again. If that doesn’t work you can reboot your phone, but if that doesn’t resolve the issue resetting the AirPods will usually fix any issues.

Resetting AirPods has 2 steps; un-pair and re-pair.

The AirPods are un-paired by following the steps on the Settings app, as below. Go to Settings -> Bluetooth and press the little i in a circle to the right of the AirPods name. Scroll to the bottom and press the Forget This Device button, and confirm your choice.

To re-pair, just open the case and a popup will appear at the bottom of the screen. Just follow the instructions, which includes pressing the small button on the back of the AirPods (see below, in blue circle) and you’ll be set.

There is another, ‘deeper’ reset you can do which returns the AirPods to factory new settings. You follow the above instructions, but when you press the button on the back of the AirPods, hold the back button down until the light on the front flashes white and orange, then press connect on the phone.

This process should resolve most issues users have with AirPods. If issues continue after these steps you may want to schedule a gadgetmanBrian consultation or visit an Apple Store.

Enjoy!

The Safari Address Bar Relocation Tip…

Hi gadgetmanBrian readers! Today’s tip is about the iPhone Safari address bar; the default position was recently relocated to the bottom of the screen, see below. Moving the address bar to the bottom allows it to be integrated with the rest of the Safari controls, and provides a convenient way to simply swipe left or right on the address bar to quickly move between open tabs.

Many readers have shared that they miss the old position of the address bar at the top, but fear not; there is an easy way to switch it back to exactly like it was before.

Just tap the aA button at the left of the address bar, and a pop up menu will appear, see below…

The top item is ‘Show Top Address Bar’, just tap it, and the address bar is back on top.

Tap aA again and the ‘Show Bottom Tab Bar’ menu item (at the bottom of the list), allows you to change it back to bottom address bar.

I’ve kept my address bar at the bottom; I like the ability to easily swipe between open tabs.

And yes, there are a bunch of other interesting-looking items in the aA menu; these will be topics of future gadgetmanBrian tips.

Enjoy!

Find My AirPods?

Your friendly neighborhood gadgetmanBrian was reading Tweets this morning when I spotted a nervous AirPod user and his sympathetic friend…

Image 1-1-24 at 4.52 PM

Fear not, Apple has provided ways to help find lost AirPods, using both GPS and (surprisingly) loud sound, in the Find My iPhone app built into every iPhone.

Check out the Apple Support article here for easy-to-follow instructions and more info.

https://support.apple.com/en-us/HT207581

Thanks for reading!

gadgetmanBrian PSA: NO NEED TO FORCE QUIT APPS ON AN iPHONE!!! 

gadgetmanBrian PSA: NO NEED TO FORCE QUIT APPS ON AN iPHONE!!! 

While working in the office for the last three weeks, there is a very common behavior I have noticed when people use their phones; force-quitting (swiping up) apps on an iPhone.

iPhone apps do not run in the background (with a few exceptions, below). Force quitting apps slows your iPhone down and actually makes your battery life worse. 

When you bring up the app switcher (by double-clicking the home button or flicking up on an iPhone X), that list of apps is actually like a browser history. It’s not showing you apps that are currently running in the background; it is simply a list of the last dozen or so apps you have used. The purpose is to make it easy to quickly switch between the last few apps you have used.

IMG_0481

On an iPhone; with very few exceptions, apps cannot keep running in the background when you are not using them, iOS limits this to maximize battery life. 

Among the kinds of apps that can actually run in the background are:

  • Location apps like Google Maps – it has to update your location;
  • Music and Audio apps like Spotify and Pandora – you want to be able to listen when the screen is off;
  • Phone and VoIP apps like Skype and Whatsapp – so you can use the device as a phone;
  • Fitness and workout apps like RunKeeper – theses apps can track your location (see above), type of workout and its associated performance data.

When you are using an app and then hit the home button, most apps ‘freeze’ their current state so when you go back to it, it loads quickly to right where you were when you last used it. Some apps use a timer to decide if, when you return to the app, you can return to where you left off or if the app is starting fresh.

Force-quitting apps seems to be an OCD-like behavior among some people; but take it from your friendly neighborhood gadgetmanBrian; this is not necessary and is a good habit to break.

If you want to be OCD about your phone; try and keep the screen clean 😉

Thanks for reading!